Here’s a detailed tutorial on how to boot Windows 10 or Windows 11 from an M2 NVME SSD Drive using Clover Boot and a physical PCIe x4 M2 NVME SSD Card on an old Legacy BIOS or UEFI BIOS-based unsupported computer system.
Table of contents
Boot and Install Windows 10 / 11 from M2 NVME SSD on an Unsupported Motherboard PC
This tutorial will help you boot Windows 10 or Windows 11 from an unsupported motherboard that does not have NVME M2 Slot. Nor does their BIOS support directly booting windows from M2 NVME Solid State Drive. Please note that this tutorial assumes you have basic knowledge of computer hardware and software installation.
Why Use an M2 NVME SSD instead of a regular SSD Drive?
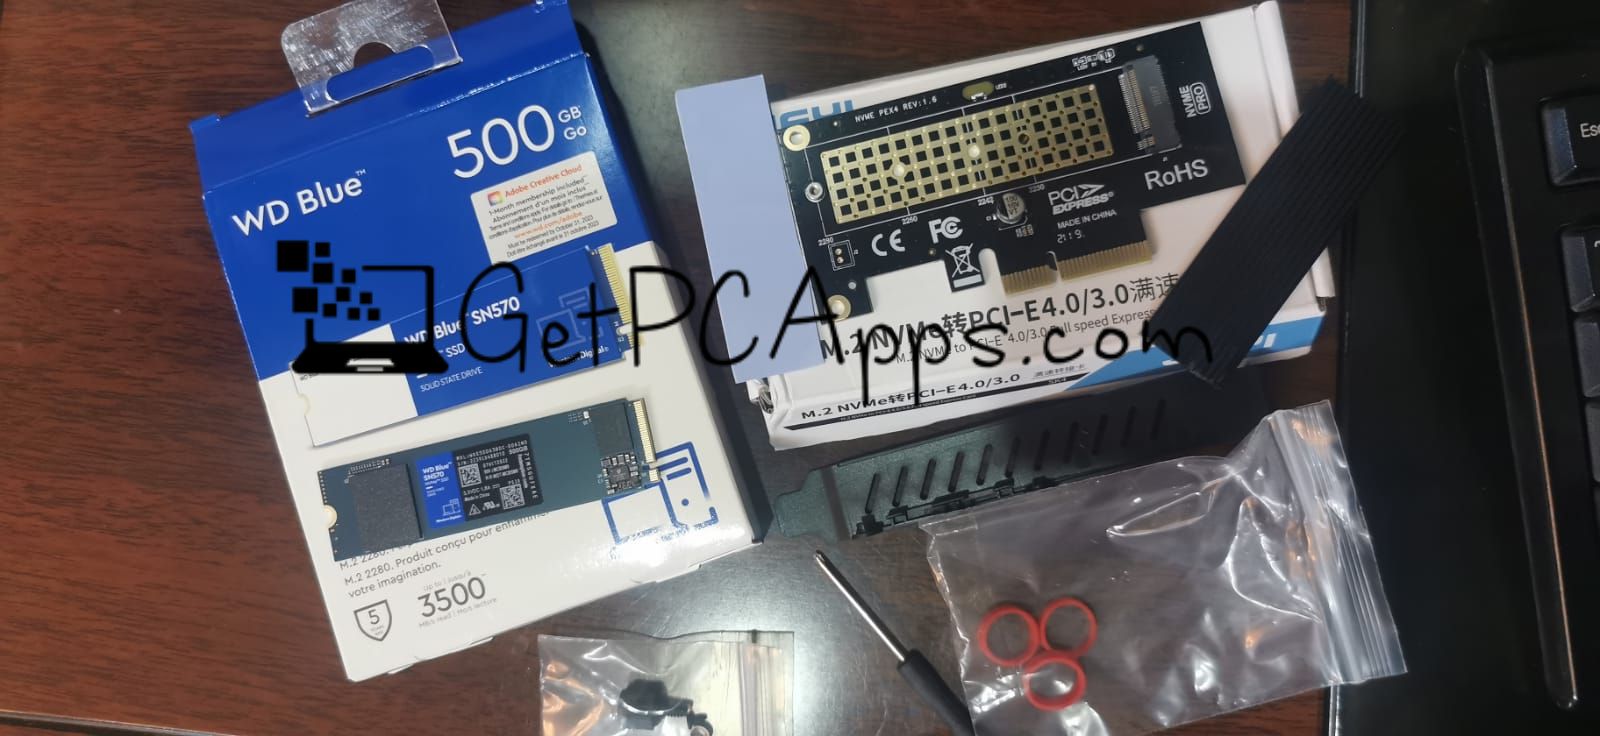
A regular SSD Drive which is usually plugged inside a LAPTOP or PC is not as fast as an M2 NVME SSD Storage. On a regular SSD drive, you will hardly get 220 Mbps read-write speeds. Whereas M2 NVME Storage can give you read-write speeds up to 1600 Mbps on PCie x2 slots, and the read-write speed increases from 3500 Mbps to 7500 Mbps if your PC’s motherboard supports PCIe x4 slot.
A. A computer with an available PCIe x4 x16 or x2 slot B. A physical PCIe x4 M2 NVME SSD card C. We will use the existing hard disk’s C drive and shrink it to create another partition where we will extract Windows 10 ISO or Windows 11 ISO and later extract Clover’s boot files in 2nd phase, which is really important D.Clover Boot software + BootIce (To make the drive bootable) + gimagex (To split install.wim file into 4GB and less two parts, so we can paste it inside FAT32 formatted Drive, that does not support file size of more than 4GB) E.MiniTool Partition Wizard v11.4 F.WinRAR or 7Zip to Extract Windows ISO Files G. A computer running Windows 7, 8, or Windows 10 on a regular hard drive
Step 1: Download Windows 10 / 11 ISO & Split Install.WIM File to Fit inside Fat32 Drive
1. Download Windows 10 or Windows 11 ISO
2. Extract the Windows ISO file using WinRAR or 7Zip software at any disk location which must be NTFS Drive.
3. Now go inside sources folder and try to locate install.wim file, it’s size must be exceeding 4GB. We need to split the file into two files less than 4GB, so that file can be easily used inside FAT32 Drive that has 4GB file limit.
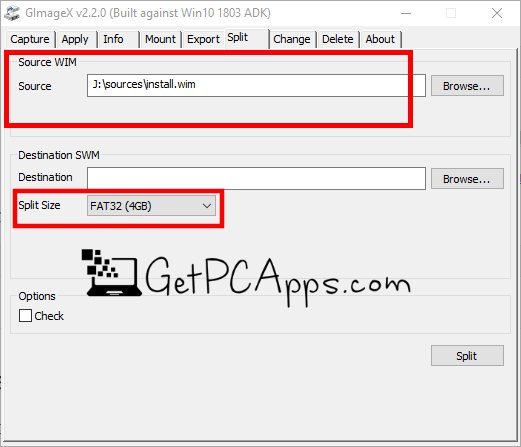
4. In the requirements step D, you have to download all tools and extract them. Open the GImageX tool 32bit or 64bit depending on your OS version. Select the install.wim file from this path for Source WIM: “Drive:\Sources\install.wim”
5. Then Choose the Destination “install.swm” path such as “C:\custom-wim\install.swm” 6. After choosing the destination, you need to choose Split Size: Select it as FAT32 (4GB)
7. Then click on the Split button
8. This process will generate two SWM files called “install.swm” and “install2.swm”
9. Paste these two “install.swm” and “install2.swm” files inside sources folder of Windows, that you had located in Step 3.
10. Remove install.wim file from this path: “Drive:\Sources\install.wim”
Step 2: Create a Boot Partition Drive from the Existing Hard Disk
1. Create a new 10GB FAT32 partition from C:/ drive by shrinking the C:/ partition using MiniTool Partition Wizard 11.4 and name the drive “Clover Boot” to remember it.
2. Copy all extracted Windows ISO files and paste them inside the “Clover Boot” Drive that you had just created.
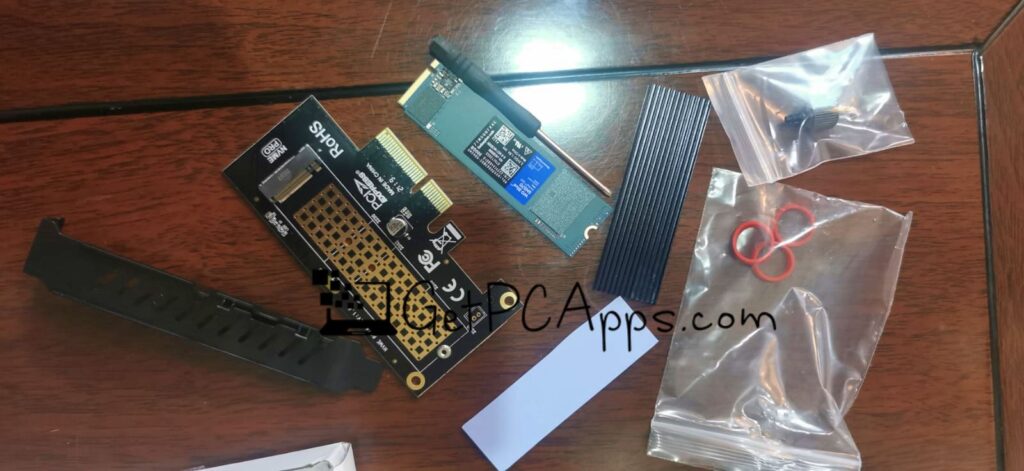
Step 3: Install the M2 NVME SSD Card
1. Turn off your computer and unplug the power cable.
2. Open your computer case and locate an available PCIe slot.
3. Insert M2 NVME SSD Drive into PCIe x4 M2 NVME SSD Card.
4. Secure the card by fastening the screws or latches on the slot.
5. Insert the physical PCIe x4 M2 NVME SSD card into the PCIe x4, x2 or x16 slot.
6. Close the computer case and reconnect the power cable.
7. Turn on your computer and format your NVME M2 Disk Drive as an NTFS GPT partition, using Mini Partition Tool. You may create partitions on NVME M2 Disk if you need to.
Step 4: Prepare the Clover Boot Drive
1. As you already had downloaded the required clover boot files above in requirements section D. Now you only need to place the files in the right place. Please follow the next step.
2. Extract the Clover Boot Files inside the “Clover Boot” Drive, and replace any Windows files, if it asks to replace them. This is a really important step.
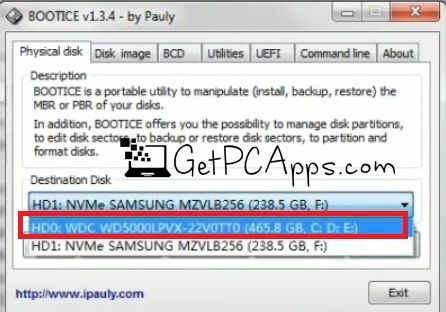
3. Run BootIce tool which was also downloaded with all tools package in requirements STEP D.
4. From the Physical Disk Tab, you need to Choose Destination Disk as your REGULAR Hard DRIVE, and not the NVME M2 Drive.
5. Then click on Process MBR
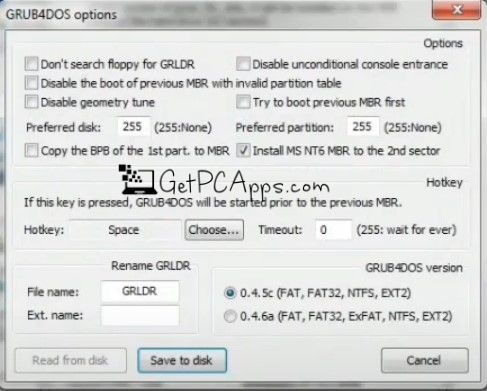
6. It will open a new Window called, Master Boot Record: Select GRUB4DOS 0.4.5c/0.4.6a (grldr.mbr) 7. Then Click on Install / Config Button at Bottom 8. It will open another Window GRUB4DOS Options, where you need to select Save to disk 9. Now you can see the message: Grub4Dos is successfully installed! Please copy GRLDR (and optional menu.lst) to the root of any partition of this disk.
10. Those two files would already be at their place when you extract the tools inside “Clover Boot Drive”
Step 5: Configure the BIOS
Since old systems cannot detect M2 NVME SSD as a boot device, due to missing IDE Controller, so we don’t need to configure legacy or UEFI BIOS at this step. This Clover boot process is being done to redirect the boot from your regular hard drive to an M2 NVME Storage Disk, so you can boot Windows 10 or Windows 11 OS from M2 NVME Disk on any old unsupported system, that does not have an official M2 NVME slot.
Step 6: Install Windows 10 or 11 on the M2 NVME SSD
1. Now you have all things in place, the next step is to reboot your computer.
2. It will bring a Clover Boot Screen where you need to select the very 1st option Microsoft EFI.. Now you will be able to see the Windows 10 or Windows 11 Setup on your screen.
3. Follow the on-screen instructions to install Windows 10 or 11 on the M2 NVME SSD. Make sure to select the M2 NVME SSD as the installation destination.
4. Complete the Windows installation process by following the prompts.
Step 7: Learn about Dual Booting Windows using Clover Boot
1. Restart your computer and your computer will automatically boot from the Clover Boot drive
2. Select the M2 NVME SSD with the Windows installation as the boot option from the Clover Boot menu.
3. Now the Clover Boot Menu will show you 3 options whenever you boot the computer, The 1st option will be Windows Installation Disk, 2nd option will always be the Windows OS that you have recently installed on M2 SSD NVME Drive, whereas 3rd option will be your old Windows System on your regular hard drive. This way, your computer will dual boot two Windows operating systems, one from M2 SSD NVME Drive, and the other one from your old regular mechanical hard disk drive.
Congratulations! You have successfully booted Windows 10 or 11 from an M2 NVME SSD Drive on your old Legacy BIOS or UEFI BIOS-based computer system using Clover Boot and a physical PCIe x4 M2 NVME SSD Card. You should now experience faster boot times using an M2 NVME Drive and improved Windows performance on your old unsupported computer system. CrystalDiskMark tool shows 1.64 Gbps as Read Speed and 1.59 Gbps as Write Speed on an M2 NVME SSD Windows Boot Drive with Clover Boot.
If you are facing any difficulty during the process, you can leave your comments and I will try my best to help you. If you think that this process is too technical to handle, and you want a helping hand for professional assistance, then you can hire me for this job. You can get back to me using the contact form or leave the comments below.
With a passion for all things tech, I delve deep into the world of Windows software and tutorials to bring you expert insights and practical advice. As a seasoned blogger, I strive to simplify complex topics and empower readers to harness the full potential of their digital devices. Join me on a journey of discovery and mastery in the ever-evolving landscape of technology.


![Download Speccy 1.3.4 Detailed Hardware Statistics for Windows [11, 10, 8, 7]](https://www.getpcapps.com/wp-content/uploads/2019/12/Download-Speccy-1.3.4-Detailed-Hardware-Statistics-for-Windows-10-8-7-1-150x150.jpg "Download Speccy 1.3.4 Detailed Hardware Statistics for Windows [11, 10, 8, 7]")


![Top 3 Best Ways to Download Windows 10 ISO [Direct Links]](https://www.getpcapps.com/wp-content/uploads/2018/12/windows-10-official-iso-file-download-direct-links-1-150x150.jpg "Top 3 Best Ways to Legally Download Windows 10 ISO File [Direct Links]")


