Have you recently upgraded to Windows 10? It comes with very different interface, which definitely arises some difficulties. Tasks which were too easy in Windows 7 or XP turns out to be cumbersome and daunting with Windows 10. Though it’s just the way we feel. Once you get used to Windows 10, it is so easy and self-intuitive. Today, we will tell you how to bring back or restore Windows 7 Photo Viewers in Windows 10.
How to Bring Back or Restore Windows 7 Photo Viewer in Windows 10?
If you have upgraded to Windows 10 or just had clean install, the process of restoring the Windows photo viewer is different. There are two different methods which can be sued to bring back windows photo viewer in Windows 10. We will discuss both of them in detail.
There is a big difference in just upgrading windows and performing the whole new installation. So the procedure of bringing back or restoring Windows Photo Viewer will not be same as well.
Method 1 (Upgrade Case)
This method focuses on restoring windows photo viewer from an upgrade. Lets very briefly explain the method step by step.
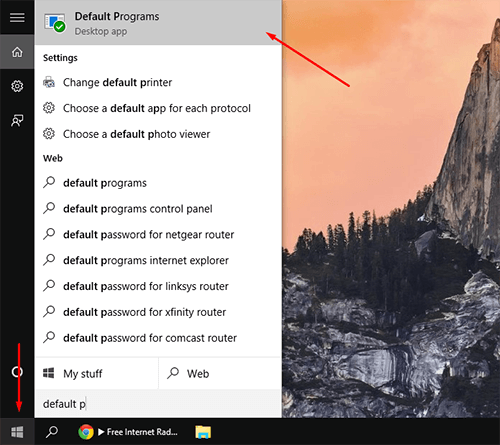
1. Click on Start button in the start menu.
2. In the search bar, type Default Programs.
3. The entry of Default Programs, will appear at the top. Hit that.
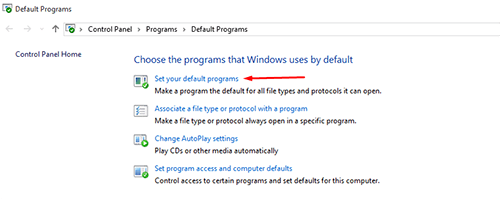
4. The following window will appear.
5. Click on Set Your Default Programs.
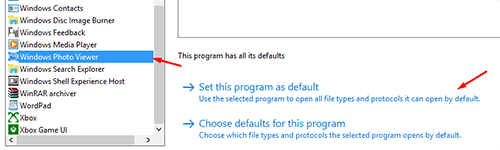
6. A menu will appear at left hand side.
7. Scroll down in this pane on left.
8. Select the option of Window Photo Viewer.
9. Now click on Select this program as default, in right hand side .
Congratulations, you have restored Windows Photo Viewer in Windows 10.
You can also go to control panel, and select default programs. After that, the procedure is same.
Method 2 (Clean & Fresh installation)
This method will guide you how to bring back Windows Photo Viewer in Windows 10, if you have just installed a clean and fresh copy of Windows 10.
Either you approach windows photo viewer by searching for default programs in start menu, or you go to control panel> settings> default programs, you will notice that windows photo viewer is there but not included in the default programs.
You will have to add the restore windows registry to your windows 10. You can download it from here.
After finishing download, run the program. It would give you a couple of registry warnings, click Yes on all of them after reading.
Once it is done, you can repeat the exact same procedure to reach default programs. Now you will see that Windows Photo Viewer is included in the list.
How To Check?
Go to settings in start menu and hit it. Click System in the window which appears. Then you will click at default apps in the left hand pane. Go to Photo Viewer in right hand side and click it. You will see the list of programs with Windows Photo Viewer included. It was not there before you download the registry and install it. Now you should have restored the Windows 7 Photo Viewer on your Windows 10 Operating System.
With a passion for all things tech, I delve deep into the world of Windows software and tutorials to bring you expert insights and practical advice. As a seasoned blogger, I strive to simplify complex topics and empower readers to harness the full potential of their digital devices. Join me on a journey of discovery and mastery in the ever-evolving landscape of technology.


![Top 3 Best Ways to Download Windows 10 ISO [Direct Links]](https://www.getpcapps.com/wp-content/uploads/2018/12/windows-10-official-iso-file-download-direct-links-1-150x150.jpg "Top 3 Best Ways to Legally Download Windows 10 ISO File [Direct Links]")

